

Who doesn’t love s’mores? The combination of melted chocolate, graham crackers, and gooey marshmallow is soooo good! Do you know what makes it even better? When you combine all of that ooey-gooey goodness with a cheesecake! Yes, a cheesecake! A Ninja Foodi S’mores cheesecake!!
To make it even better, I made HOMEMADE MARSHMALLOW FLUFF to put on top! OMG! I am so glad that I did. It turned out so good…..I ate the leftovers by the spoonful! Yummmm!
This is a variation of my go-to recipe for making cheesecake in the Ninja Foodi. Something to note- there is NO CORN STARCH in this recipe. Many of the very popular cheesecake recipes call for corn starch. It’s a personal preference of mine, but I do not add corn starch. In my opinion, corn starch creates a gummy almost gel-like texture and I prefer a creamy and almost fluffy texture for my cheesecake.

You will also notice that my cheesecake recipe is made in the blender instead of stirring by hand or using a hand mixer. Why do you ask? Because it’s super easy and creates a very smooth texture without any cream cheese lumps. Once I started putting cheesecake batter in the blender to mix it, I have not gone back! You will need to tap the cheesecake on the counter (in the pan) several times- about 10- before and possibly after baking it so that you remove as much air as possible.

Tips for making Ninja Foodi S’mores Cheesecake:
1. Make your own HOMEMADE MARSHMALLOW FLUFF to use as the frosting! It’s pretty easy to make and is super delicious! How good does that look???↓↓↓↓↓↓↓↓↓

2. Leave cream cheese, butter, and eggs on the counter so that they are at room temperature when you begin to make your cheesecake. If you use cold ingredients, your cheesecake could be lumpy.
3. Mix your ingredients in a blender and not a mixer. I have always used a mixer and found that regardless of the temperature of the ingredients, I ended up with lumps. Through trial and error, I have found that it is much, much, much easier to combine the ingredients in a blender.
4.If your cheesecake blooms and overflows the pan while cooking, DON'T PANIC!!! Simply tap the cheesecake (while still in the springform pan) on the counter before and after cooking. The cheesecake will settle back into the pan and as it cools you will see it continue to settle.
5. If you don't have a silicone sling, you can use foil. Simply cut a piece of foil 18 inches long and fold it so in half and then in half again. You will end up with a piece of foil that is 18 inches long by 3 inches wide. Place the foil on the counter and place the springform in the middle. Carefully pick up the springform by holding the foil by the ends. You have a homemade sling!

Looking for more Ninja Foodi recipes? Check out some of our favorites!
- Ninja Foodi Carrot Cake Cheesecake
- Homemade Marshmallow Fluff
- Ninja Foodi Vanilla Bean Cheesecake with Sour Cream Topping
- Ninja Foodi Lemon Meringue Cheesecake


Ingredients for making Ninja Foodi S’mores Cheesecake:
Crust:
- 8 full graham crackers- If your graham crackers come boxed with 3 packages in the box, use one package minus 1 full cracker.
- ¼ cup white sugar
- ¼ brown sugar
- 6 tablespoons butter- melted
- Pinch of salt
Cheesecake Filling:
- 24-ounce cream cheese- room temperature
- ¾ cup sugar
- 1 tablespoon vanilla-I highly recommend using vanilla bean paste!
- 3 eggs
- ¼ cup mini marshmallows
- ¼ cup chocolate chips
S’mores Topping:
- 2 cups marshmallow fluff (can use store-bought or make your own) (If you make your own Homemade Marshmallow Fluff, you only need the half recipe.)
- ¼ cup chocolate sauce
- ¼ mini marshmallows
- 1 graham cracker-crushed
- ¼ cup mini chocolate chips
Directions for making Ninja Foodi S’mores Cheesecake:
1.Make the crust!
- Combine all crust ingredients in a blender and blend until the mixture becomes the consistency of damp sand.
- Pour crust ingredients into a 7-inch springform pan. Be sure to pat down the crust using a spatula or spoonula. The crust should cover the entire bottom of the pan and about an inch of the side of the pan. [one_third_last][/one_third_last]
2.Make the cheesecake filling:
- Clean out your blender. You're going to use it again. 🙂
- Combine all cream cheese, sugar, vanilla, and eggs in a blender and blend just until fully combined. Do not over mix. The more you mix the cheesecake filling, the more air that will get added. The more air, the fluffier the cheesecake will be. I was looking for a denser cheesecake so I made sure to only blend until combined.
- Add in ¼ chocolate chips and ¼ mini marshmallows. Blend for 3-5 seconds. This should be a very quick blend just long enough to break up the chocolate chips and marshmallows.
- Pour all of the cheesecake mixtures into the springform pan on top of the crust. Pan should be about ¾ of the way full.
- Tap the filled pan several times on the counter to eliminate all of the extra air. Cover the entire pan with aluminum foil. Be sure to cover the bottom and sides too. [one_third_last][/one_third_last]
3.Bake the cheesecake:
- Place silicone or metal trivet into the pressure cooker along with 2 cups of water.
- Place springform pan into your sling. I use the OXO Good Grips Sling and it works perfectly. If you don't have a sling, you can make one by folding strips of foil and cradling your pan in and out of the Ninja Foodi.
- Gently place sling into Ninja Foodi onto the trivet. Close Ninja Foodi pressure cooking lid and cook on high pressure for 45 minutes. Once the timer beeps, let pressure natural release for 25 minutes. Release remaining steam and open lid.
- Gently remove sling and cheesecake from the pressure cooker. Remove the foil. The center of the cheesecake will have a jiggly spot about the size of a half-dollar. If more of the center is jiggly, pressure cook for an additional 5 minutes. If the cheesecake has blossomed, gently tap on the countertop several times to remove additional air.
- Using a knife, gently separate the cheesecake from the sides of the pan. You just want to make sure that it doesn't stick once it's cooled.
- Cool on the counter for about an hour and then place in the refrigerator. Cool cheesecake for at least 2 hours.
- Remove cheesecake from pan. [one_third_last][/one_third_last]
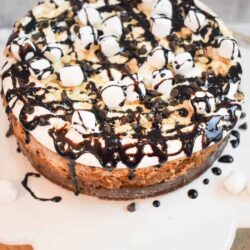
4.Decorate the cheesecake:
- Depending on what type of chocolate sauce you are using, you may need to melt it to make it easy to pour. If needed, melt chocolate sauce until it is a pour-able consistency. Pour ½ of the chocolate sauce on the top of the cheesecake, it’s ok if it drips over the side a little bit.
- Evenly top the cheesecake with marshmallow fluff. I put it in a piping bag and piped the frosting in a swirl design on the top but you can spread it on with a knife or spatula if desired.
- Sprinkle mini marshmallows, chocolate chips, and crushed graham crackers on the top, and then drizzle with remaining chocolate sauce.
Pin recipe for later!!
")
Recipe
Ninja Foodi S’mores Cheesecake
Rate this Recipe Print Recipe Pin RecipeIngredients
Crust
- 8 graham crackers (8 full graham crackers- If your graham crackers come boxed with 3 packages in the box, use one package minus 1 full cracker.)
- ¼ cup white sugar
- ¼ cup brown sugar
- 6 tablespoons butter (melted)
- pinch salt
Cheesecake Filling
- 24 ounce cream cheese (room temperature)
- ¾ cup sugar
- 1 tablespoon vanilla (I highly recommend using vanilla bean paste!)
- 3 eggs
- ¼ cup marshmallows (mini)
- ¼ cup chocolate chips (mini)
S'mores Topping
- 2 cups marshmallow fluff (can use store bought or make your own (If you make your own Homemade Marshmallow Fluff, you only need the half recipe.))
- ¼ cup chocolate sauce
- ¼ cup marshmallows (mini)
- 1 graham cracker (crushed)
- ¼ cup chocolate chips (mini)
Instructions
Make the crust
- Combine all crust ingredients in a blender and blend until mixture becomes the consistency of damp sand.
- Pour crust ingredients into a 7 inch springform pan. Be sure to pat down the crust using a spatula or spoonula. The crust should cover the entire bottom of the pan and about an inch of the side of the pan.
Make the cheesecake filling
- Clean out your blender. You're going to use it again. 🙂
- Combine all cream cheese, sugar, vanilla and eggs in a blender and blend just until fully combined. Do not over mix. The more you mix the cheesecake filling, the more air that will get added. The more air, the fluffier the cheesecake will be. I was looking for a denser cheesecake so I made sure to only blend until combined.
- Add in ¼ chocolate chips and ¼ mini marshmallows. Blend for 3-5 seconds. This should be a very quick blend just long enough to break up the chocolate chips and marshmallows.
- Pour all of the cheesecake mixture into springform pan on top of crust. Pan should be about ¾ of the way full.
- Tap the filled pan several times on the counter to eliminate all of the extra air. Cover entire pan with aluminum foil. Be sure to cover the bottom and sides too.
Bake the cheesecake
- Place trivet into pressure cooker along with 2 cups of water.
- Place springform pan into your sling. I use the OXO Good Grips Sling and it works perfectly. If you don't have a sling, you can make one by folding strips of foil and cradling your pan in and out of the Ninja Foodi.
- Gently place sling into Ninja Foodi onto trivet. Close Ninja Foodi pressure cooking lid and cook on high pressure for 45 minutes. Once timer beeps, let pressure natural release for 25 minutes. Release remaining steam and open lid.
- Gently remove sling and cheesecake from pressure cooker. Remove the foil. The center of the cheesecake will have a jiggly spot about the size of a half dollar. If more of the center is jiggly, pressure cook for an additional 5 minutes. If the cheesecake has blossomed, gently tap on counter top several times to remove additional air.
- Using a knife, gently separate cheesecake from sides of pan. You just want to make sure that it doesn't stick once it's cooled.
- Cool on counter for about an hour and then place in refrigerator. Cool cheesecake for at least 2 hours.
- Remove cheesecake from pan.
Decorate the cheesecake
- Depending on what type of chocolate sauce you are using, you may need to melt it to make it easy to pour. If needed, melt chocolate sauce until it is a pour-able consistency. Pour ½ of the chocolate sauce on the top of the cheesecake, it's ok if it drips over the side a little bit.
- Evenly top the cheesecake with marshmallow fluff. I put it in a piping bag and piped the frosting in a swirl design on the top but you can spread it on with a knife or spatula if desired.
- Sprinkle mini marshmallows, chocolate chips and crushed graham crackers on the top and then drizzle with remaining chocolate sauce.
Nutrition
Nutrition information is provided as a courtesy and is an estimate only.


Comments
No Comments