
The second that the new NINJA FOODI DELUXE came out, I immediately bought it! I’m not exaggerating! I signed up for email notifications for the minute that it was available on the Ninja website. I ordered it the day that it came out and was so incredibly excited to get it in the mail 2 days later! Why was I excited? Well, there’s the updated look of the unit, but there’s also the fact that it has a YOGURT button!!!! What? Yes!!!!!!
Jump to:

So, I don’t eat a lot of yogurt, but my family does so I figured this was a pretty good excuse to get a new NINJA FOODI!! 🙂
I was so excited to get to work on my very first homemade yogurt that I didn’t do a lot of research……..and I paid deeply for that mistake! But, lucky for you, I’m sharing all of my mistakes with you so that you don’t make the same ones!
Take 1: My first attempt at making yogurt!!
- I was so excited to make yogurt that I didn’t spend enough time looking through the user manual of my new NINJA FOODI DELUXE!! OOOOPS! So, I ended up slow cooking milk for roughly 12 hours. I don’t recommend this to anyone. The final result was a liquid brown smelly goo. I did not have any yogurt!!!
- I made the mistake of stopping on the function that says slow cook/yogurt. I didn’t realize that I needed to go one more notch to actually get to the yogurt function. Instead, I ended up waiting for the milk to boil for roughly 5 hours before going to bed for the night. The cookbook that comes with the Ninja Foodi said that it could take several hours for the milk to boil. Yes, 5 hours seemed like a long time. I spent some time online looking to see how long it should take and I came up with nothing. So, I let it keep going……for hours and hours.
- When I woke up in the morning, the screen still had not changed. So, I opened up the lid…and there it was……my boiled milk. Gross. I poured it down the drain and decided to start again.


Take 2: Do Over!!
- Thank goodness I bought an entire gallon of milk for try number one. I had only used half of the gallon so I didn’t need to go to the grocery store for more supplies. This round, I actually pushed the turned the dial until it said “yogurt!!” I know- it seems so easy! I don’t know how I missed this the first time.
- I used the same milk, yogurt starter, vanilla and honey. I followed the same exact steps. The only difference is that the screen actually changed to show “boil, “”add and stir,” and “incubate!” We are making progress!! The boiling portion did not take 5 hours this time. To my amazement, it boiled in less than an hour! Yippeee!!! We are going to have real yogurt this time!!! Finally, the beep went off and it was time to see my beautiful, thick, yogurt. And then it happened! I opened the lid and I had yogurt soup! What the heck!!!???
- Ok, so- lesson learned. DO NOT ADD HONEY while the yogurt is cooking! Why you ask? Apparently honey has something in it that reacts with the active yogurt cultures that prevents the yogurt from fully forming. Once again- I should have researched this before making it. Lucky for you, I made this mistake so that you don’t have to.
- To try and get the yogurt a little thicker, I put it in the refrigerator overnight. It did get a little thicker but was still more like drinkable yogurt and less like regular yogurt. Once we got past the consistency (similar to white glue lol), the flavor was actually pretty good. We were moving in the right direction!!


Take 3: Third time’s a charm!!
- Ok, so I ran out of milk and yogurt starter so I needed to go to the store to get more supplies. I bought different milk and yogurt. I figured at this point it couldn’t hurt. I bought the highest fat % yogurt that I could find. 5%! That’s got to do something right!?!
- At this point, I was determined to make actual yogurt! I used the actual yogurt function and skipped the honey and vanilla. Needless to say, my family had lost faith in my yogurt making abilities but I was determined to get it right! To my amazement, it worked!!! I ended up with thick, beautiful yogurt!!! Directions and recipe below to accomplish Take 3 yogurt….I’ll spare you all of the details on Take 1 and Take 2!


Tips for making Ninja Foodi Yogurt:
Do not add honey to the yogurt until you have completed the incubation period and have refrigerated the yogurt for a couple of hours.
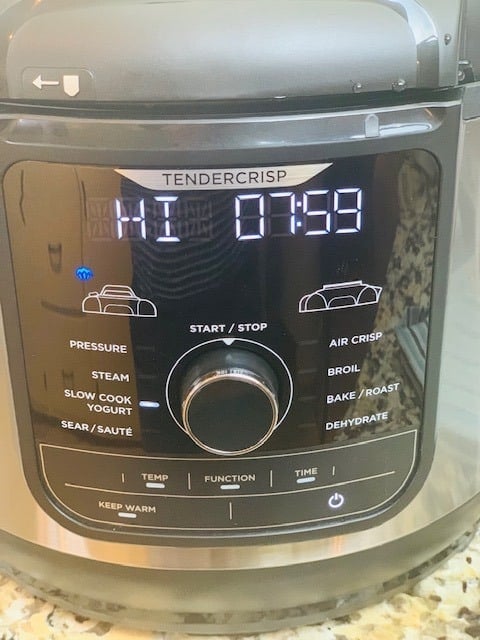
Be sure that you are actually using the “yogurt” function and not the “slow cook” option.
Be patient! If the yogurt does not set up quite as much as you would like, continue to incubate it longer. You can continue to incubate before you reach the refrigeration step.
Ingredient tips and substitutions for making Ninja Foodi Yogurt
The full ingredient list is at the bottom of this post in the recipe card.

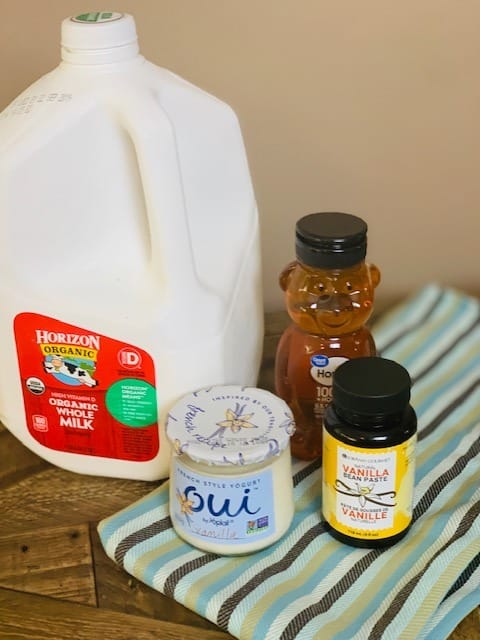
- ½ Gallon of whole milk- Ultra-pasteurized worked best for me
- 2 Tablespoons of yogurt- it must have active yogurt cultures
- 1 Tablespoon of vanilla extract or vanilla bean paste
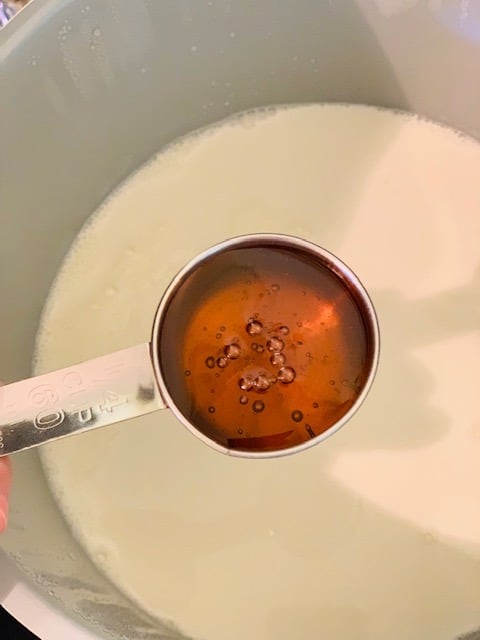
- ½ Cup of honey
Directions for Making Ninja Foodi Yogurt:
- Turn the Ninja Foodi Deluxe “on.”
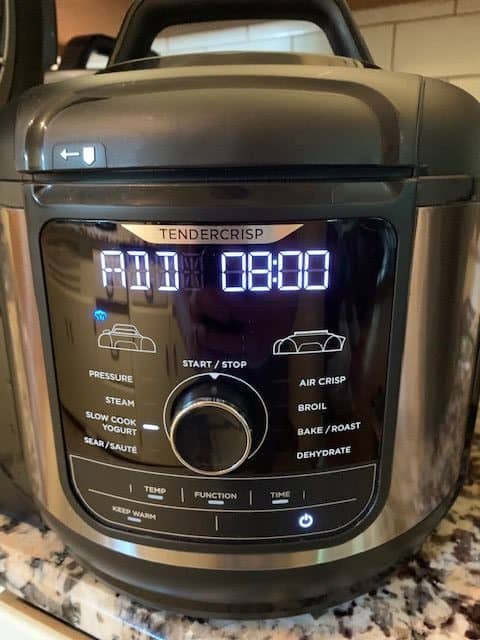
- Choose the “yogurt” function. (Be sure that the screen says yogurt and not “hi.”)
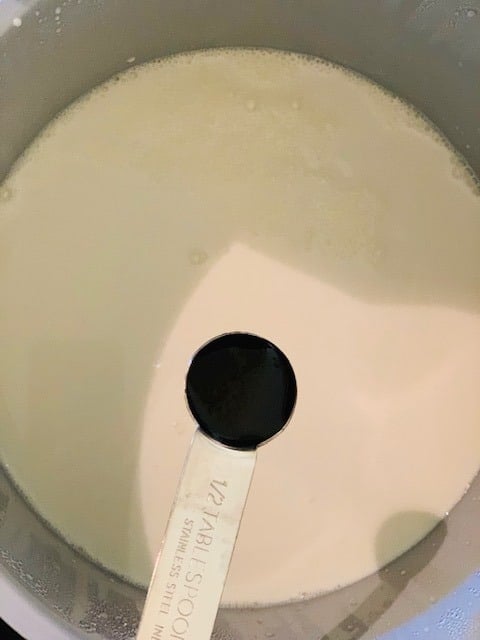
- Pour in ½ gallon of milk. Do not add in yogurt, flavors or sweeteners. Only the milk should be added in this step.
- Close the “pressure cooker” lid and move valve to “vent.”
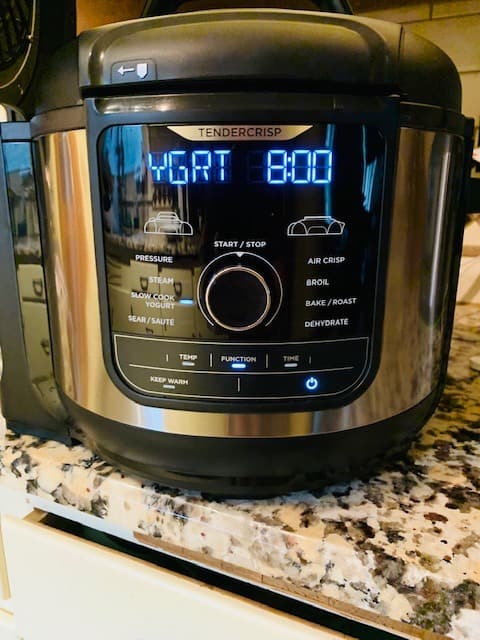
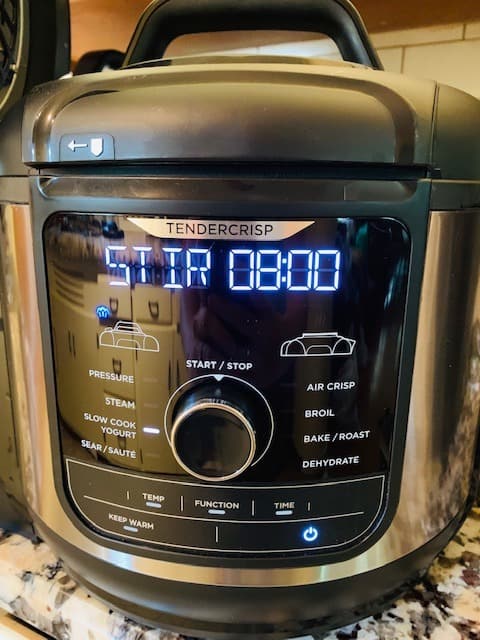
- Push the start button. The screen should say “yogurt” and be set to a time of 8:00.
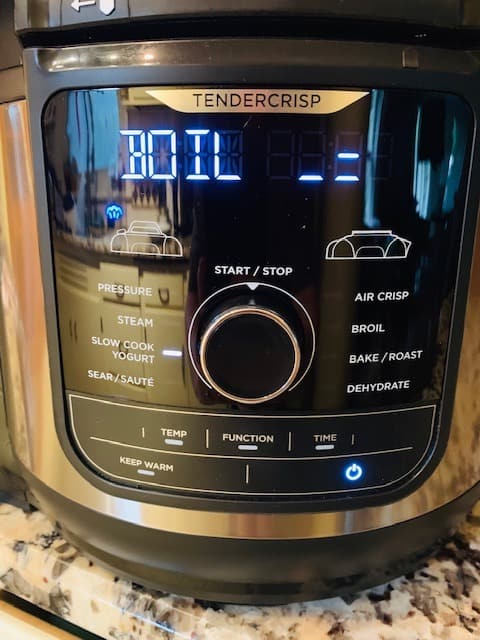
- Milk will boil in the pot during the initial cooking time. Once the milk has reached a boil, the Ninja Foodi Deluxe will beep and the screen will say “boil” on it. This step should take about an hour.
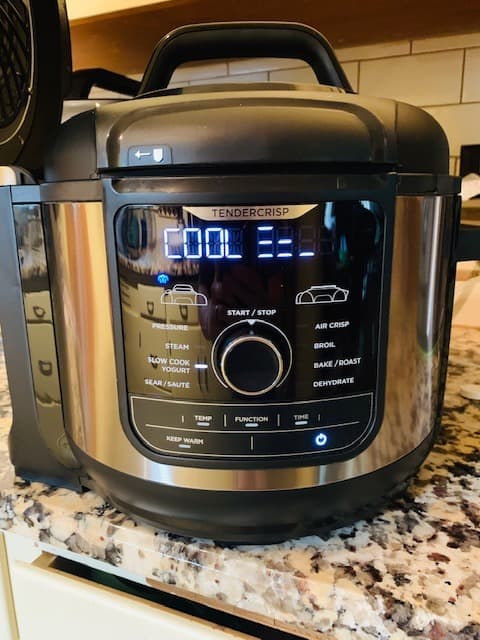
- After the milk has boiled, it will need to cool. The Ninja Foodi Deluxe will automatically change to the “cool” mode. The milk will cool for about an hour or so. Don’t panic if it does take longer.
- Once the milk has cooled, the Ninja Foodi Deluxe will beep and the screen will say “add and stir.” When this happens, open the “pressure cooker” lid.
- Add in 2 tablespoons of yogurt (the yogurt must have active yogurt cultures).
- Whisk the milk and yogurt together with a plastic or silicone whisk. Do not use a metal whisk as this will scrape the pot.
- Replace the “pressure cooker” lid and make sure valve is set to “vent” position.
- Push start button again to get the Ninja Foodi Deluxe going again.
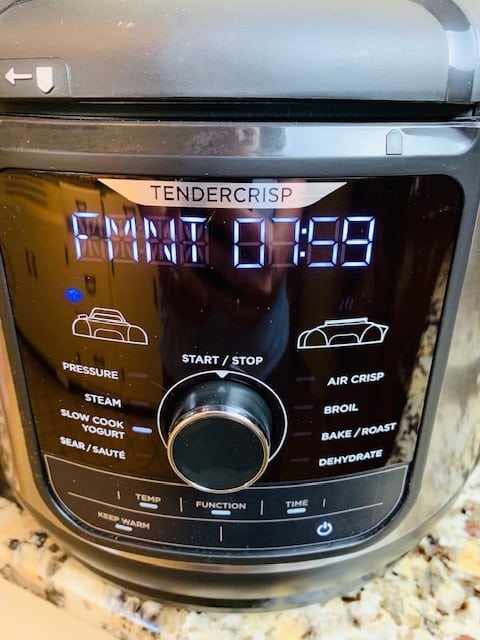
- The screen should now say “incubate” and be set to 8 hours.
- Let the yogurt incubate. When the timer beeps, remove the lid and check to make sure that the yogurt has set up. You can do so by stick a spoon in the middle of the yogurt. The spoon should stand up on it’s own.
- Refrigerate yogurt for at least 4 hours.
- Add in honey and vanilla extract or vanilla bean paste. Stir until well combined.
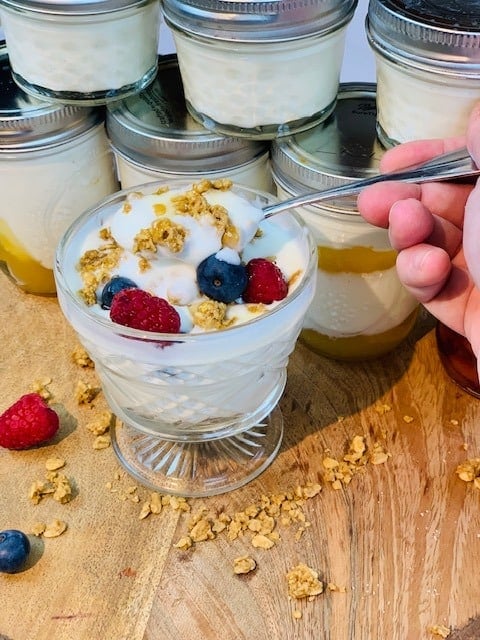
- Place into mason jars or whatever food storage containers you prefer.
Recipe

Ninja Foodi Vanilla Yogurt
Rate this Recipe Print Recipe Pin RecipeEquipment
Ingredients
- ½ gallon Milk (Ultra Pasteurized)
- 2 tablespoon Yogurt (Plain with active yogurt cultures- Any brand will do but the Fage 5% plain Greek yogurt worked for me!)
- 1 tablespoon Vanilla Extract (I used vanilla bean paste! :))
- ½ cup Honey
Instructions
- Turn the Ninja Foodi Deluxe "on."Choose the "yogurt" function. (Be sure that the screen says yogurt and not "hi.")
- Pour in ½ gallon of milk. Do not add in yogurt, flavors or sweeteners. Only the milk should be added in this step.
- Close the "pressure cooker" lid and move valve to "vent."
- Push the start button. The screen should say "yogurt" and be set to a time of 8:00.
- Milk will boil in the pot during the initial cooking time. Once the milk has reached a boil, the Ninja Foodi Deluxe will beep and the screen will say "boil" on it. This step should take about an hour.
- After the milk has boiled, it will need to cool. The Ninja Foodi Deluxe will automatically change to the "cool" mode. The milk will cool for about an hour or so. Don't panic if it does take longer.
- Once the milk has cooled, the Ninja Foodi Deluxe will beep and the screen will say "add and stir." When this happens, open the "pressure cooker" lid.Add in 2 tablespoons of yogurt (the yogurt must have active yogurt cultures).
- Whisk the milk and yogurt together with a plastic or silicone whisk. Do not use a metal whisk as this will scrape the pot.
- Replace the "pressure cooker" lid and make sure valve is set to "vent" position.
- Push start button again to get the Ninja Foodi Deluxe going again.
- The screen should now say "incubate" and be set to 8 hours.Let the yogurt incubate. When the timer beeps, remove the lid and check to make sure that the yogurt has set up. You can do so by stick a spoon in the middle of the yogurt. The spoon should stand up on it's own.
- Refrigerate yogurt for at least 4 hours.
- Add in honey and vanilla extract or vanilla bean paste. Stir until well combined.
- Place into mason jars or whatever food storage containers you prefer.
Notes
- Do not add honey to the yogurt until you have completed the incubation period and have refrigerated the yogurt for a couple of hours.
- Be sure that you are actually using the “yogurt” function and not the “slow cook” option.
- Be patient! If the yogurt does not set up quite as much as you would like, continue to incubate it longer. You can continue to incubate before you reach the refrigeration step.
Nutrition
Nutrition information is provided as a courtesy and is an estimate only.


Jajeanna Moyer says
You didn’t have to drain off the whey? Every batch I have made I have to drain off the whey. The long it drains the thicker my yogurt is.
Haley Homemaker says
To save time, I heated my milk on the stovetop with a thermometer, stirring constantly until it reached 180°F. Once it hit the target temperature, I transferred it to the Ninja Foodi pot and placed it in a sink filled with ice to quickly cool it down to 110°F, which took about 10 minutes.
I then set the Ninja Foodi to “Yogurt,” skipped the initial boil stage by pressing the temperature button once to switch the setting from “yogurt” to “ferment,” and extended the preset time from 8 hours to 12 hours for a thicker, Greek-style consistency.
After the first 12 hours, the yogurt looked and smelled wonderful, but I decided to extend the fermentation by another 12 hours, following tips from traditional yogurt makers for an even thicker texture. Some liquid formed around the edges, which is normal and can be strained off if desired.
Using the stovetop for pasteurization and cooling shortened the process to about 40 minutes, much quicker than the 2-4 hours it can take with some Ninja Foodi models. Next time, I might try doing everything in the Foodi to save on dishes.
For now, I’ll keep my yogurt plain and add sweetener as I serve it, although I’m a big fan of vanilla yogurt and love this recipe with honey and vanilla. Thanks for sharing your experience and including all the details—the “bloopers” are often the most interesting part!
Hope this helps anyone looking to speed up the process!
Sarah says
Thank you for that helpful tip!
Brooke says
If your milk does not initially boil to 180 degrees it will never set. Open it up and check it with a thermometer and us the sauté setting if you need to get it hotter.
ally says
If you do this and use the sautes setting, how do you cook the rest of the yogurt. It takes me to the beginning of the yogurt 8 hr boil process (not incubate). How do I skip through to the second half of the yogurt cooking process? or do I incubate using a different mode?
P says
Press the temperature button down once and it’ll switch from boil to fermentation mode. This will skip the boil and cool settings if you choose to heat separately.
DH says
Wow, thanks for the pointer on Slow Cook vs. Yogurt! We slow cooked our milk for 8 hours, wondering why it wasn’t cooling off, then we got (more) suspicious once the Keep Warm light turned on. Searched online for answers, ended up here. We’ll update once we actually make a batch!
Aimee Eitel says
I got suspicious this morning after 3 hours 🤣 glad to know I’m not the only one…. Would it have killed then too have an extra knob light between slow cook and yogurt?🙄. I’ll be getting up at 12:30 tonight to check it…it’s incubating with 4 hrs left.
Carla says
What type of milk does everyone use? My yogurt only seems to work when I use Fairlife ultra filtered milk. Turns out perfectly. When I try making it with regular whole organic milk it is super runny. I’m hoping it sets up overnight in the refrigerator but I am skeptical.
Catherine says
Finally, I found this for my 3rd yogurt effort and it worked. I had tried using the powder with no success but when I used the yogurt with active cultures I had success. I put my milk in a container overnight with lavender seeds and strained it for a slightly floral smell and taste. Delicious!
Lauren Cardona says
I’m so glad you found my post! Making yogurt can be a little tricky. It sounds like you got it figured out and made some delicious yogurt! The addition of the lavender seeds sounds interesting!