
The second that the new NINJA FOODI DELUXE came out, I immediately bought it! I’m not exaggerating! I signed up for email notifications for the minute that it was available on the Ninja website. I ordered it the day that it came out and was so incredibly excited to get it in the mail 2 days later! Why was I excited? Well, there’s the updated look of the unit, but there’s also the fact that it has a YOGURT button!!!! What? Yes!!!!!!
Jump to:

So, I don’t eat a lot of yogurt, but my family does so I figured this was a pretty good excuse to get a new NINJA FOODI!! 🙂
I was so excited to get to work on my very first homemade yogurt that I didn’t do a lot of research……..and I paid deeply for that mistake! But, lucky for you, I’m sharing all of my mistakes with you so that you don’t make the same ones!
Take 1: My first attempt at making yogurt!!
- I was so excited to make yogurt that I didn’t spend enough time looking through the user manual of my new NINJA FOODI DELUXE!! OOOOPS! So, I ended up slow cooking milk for roughly 12 hours. I don’t recommend this to anyone. The final result was a liquid brown smelly goo. I did not have any yogurt!!!
- I made the mistake of stopping on the function that says slow cook/yogurt. I didn’t realize that I needed to go one more notch to actually get to the yogurt function. Instead, I ended up waiting for the milk to boil for roughly 5 hours before going to bed for the night. The cookbook that comes with the Ninja Foodi said that it could take several hours for the milk to boil. Yes, 5 hours seemed like a long time. I spent some time online looking to see how long it should take and I came up with nothing. So, I let it keep going……for hours and hours.
- When I woke up in the morning, the screen still had not changed. So, I opened up the lid…and there it was……my boiled milk. Gross. I poured it down the drain and decided to start again.


Take 2: Do Over!!
- Thank goodness I bought an entire gallon of milk for try number one. I had only used half of the gallon so I didn’t need to go to the grocery store for more supplies. This round, I actually pushed the turned the dial until it said “yogurt!!” I know- it seems so easy! I don’t know how I missed this the first time.
- I used the same milk, yogurt starter, vanilla and honey. I followed the same exact steps. The only difference is that the screen actually changed to show “boil, “”add and stir,” and “incubate!” We are making progress!! The boiling portion did not take 5 hours this time. To my amazement, it boiled in less than an hour! Yippeee!!! We are going to have real yogurt this time!!! Finally, the beep went off and it was time to see my beautiful, thick, yogurt. And then it happened! I opened the lid and I had yogurt soup! What the heck!!!???
- Ok, so- lesson learned. DO NOT ADD HONEY while the yogurt is cooking! Why you ask? Apparently honey has something in it that reacts with the active yogurt cultures that prevents the yogurt from fully forming. Once again- I should have researched this before making it. Lucky for you, I made this mistake so that you don’t have to.
- To try and get the yogurt a little thicker, I put it in the refrigerator overnight. It did get a little thicker but was still more like drinkable yogurt and less like regular yogurt. Once we got past the consistency (similar to white glue lol), the flavor was actually pretty good. We were moving in the right direction!!


Take 3: Third time’s a charm!!
- Ok, so I ran out of milk and yogurt starter so I needed to go to the store to get more supplies. I bought different milk and yogurt. I figured at this point it couldn’t hurt. I bought the highest fat % yogurt that I could find. 5%! That’s got to do something right!?!
- At this point, I was determined to make actual yogurt! I used the actual yogurt function and skipped the honey and vanilla. Needless to say, my family had lost faith in my yogurt making abilities but I was determined to get it right! To my amazement, it worked!!! I ended up with thick, beautiful yogurt!!! Directions and recipe below to accomplish Take 3 yogurt….I’ll spare you all of the details on Take 1 and Take 2!


Tips for making Ninja Foodi Yogurt:
Do not add honey to the yogurt until you have completed the incubation period and have refrigerated the yogurt for a couple of hours.
Be sure that you are actually using the “yogurt” function and not the “slow cook” option.
Be patient! If the yogurt does not set up quite as much as you would like, continue to incubate it longer. You can continue to incubate before you reach the refrigeration step.
Ingredient tips and substitutions for making Ninja Foodi Yogurt
The full ingredient list is at the bottom of this post in the recipe card.

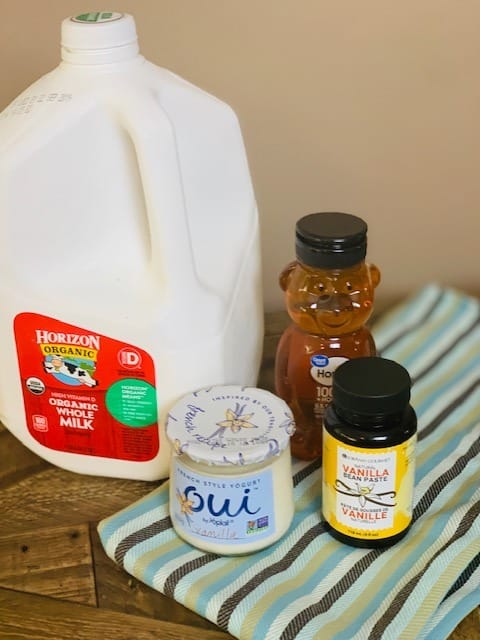
- ½ Gallon of whole milk- Ultra-pasteurized worked best for me
- 2 Tablespoons of yogurt- it must have active yogurt cultures
- 1 Tablespoon of vanilla extract or vanilla bean paste
- ½ Cup of honey
Directions for Making Ninja Foodi Yogurt:
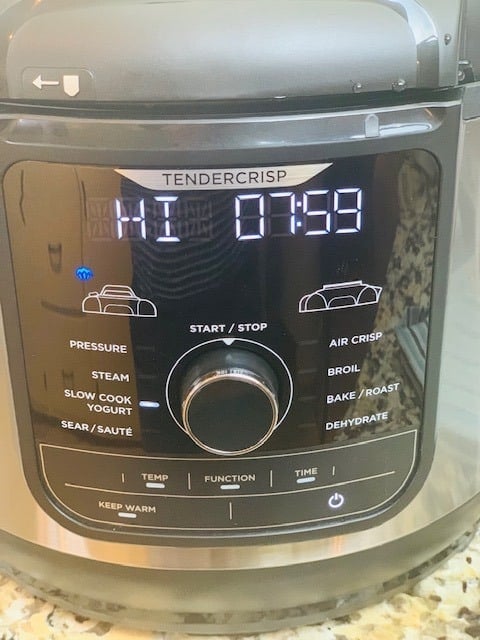
- Turn the Ninja Foodi Deluxe “on.”
- Choose the “yogurt” function. (Be sure that the screen says yogurt and not “hi.”)
- Pour in ½ gallon of milk. Do not add in yogurt, flavors or sweeteners. Only the milk should be added in this step.
- Close the “pressure cooker” lid and move valve to “vent.”
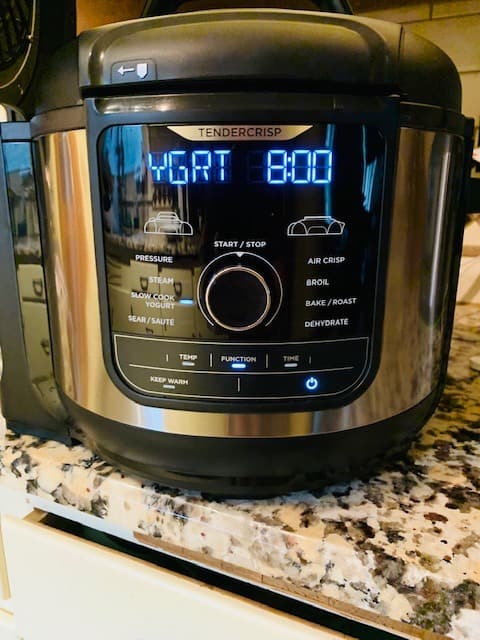
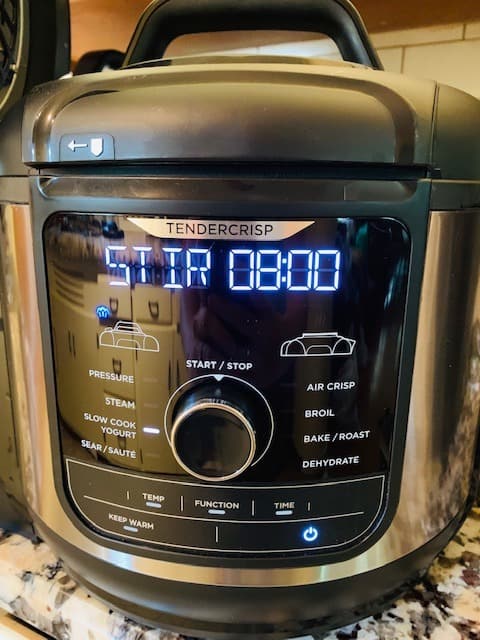
- Push the start button. The screen should say “yogurt” and be set to a time of 8:00.
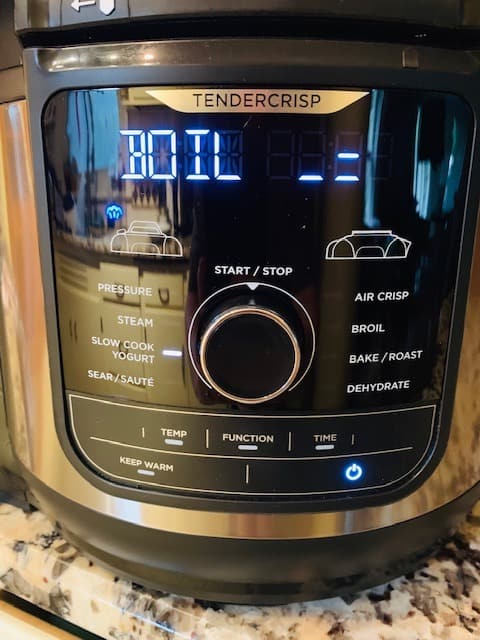
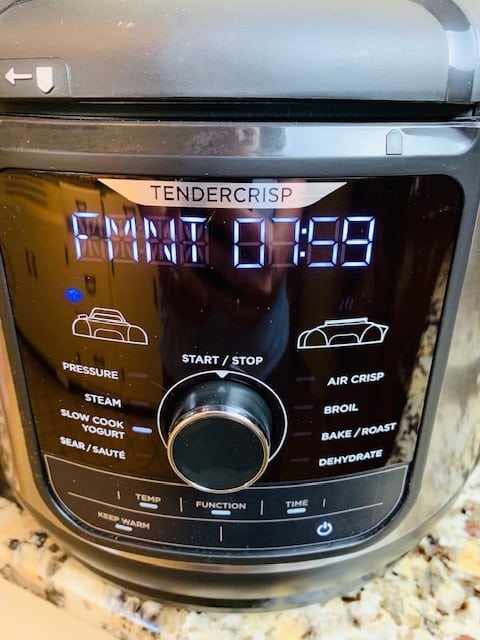
- Milk will boil in the pot during the initial cooking time. Once the milk has reached a boil, the Ninja Foodi Deluxe will beep and the screen will say “boil” on it. This step should take about an hour.
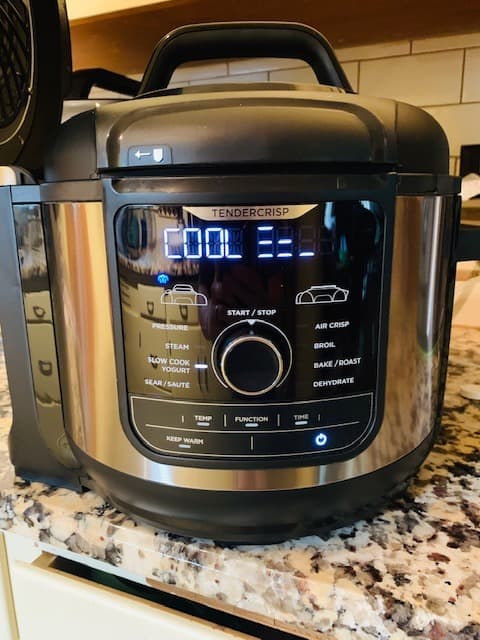
- After the milk has boiled, it will need to cool. The Ninja Foodi Deluxe will automatically change to the “cool” mode. The milk will cool for about an hour or so. Don’t panic if it does take longer.
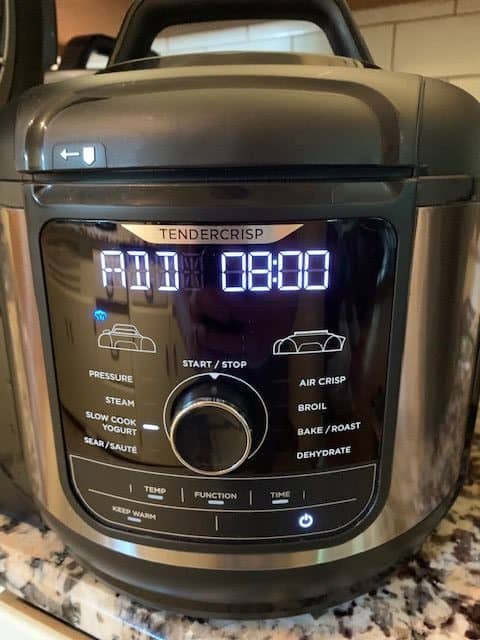
- Once the milk has cooled, the Ninja Foodi Deluxe will beep and the screen will say “add and stir.” When this happens, open the “pressure cooker” lid.
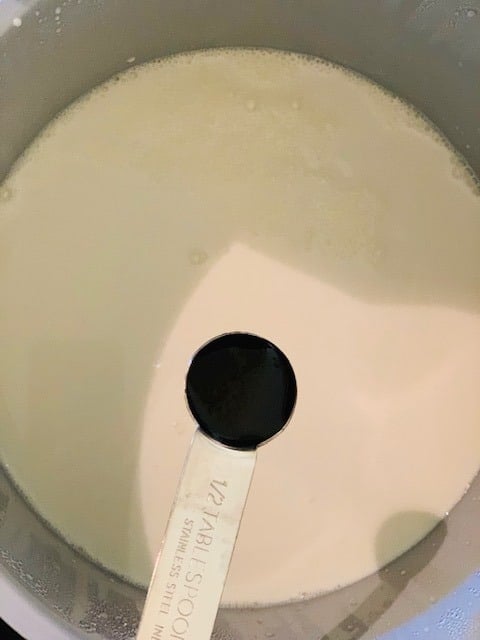
- Add in 2 tablespoons of yogurt (the yogurt must have active yogurt cultures).
- Whisk the milk and yogurt together with a plastic or silicone whisk. Do not use a metal whisk as this will scrape the pot.
- Replace the “pressure cooker” lid and make sure valve is set to “vent” position.
- Push start button again to get the Ninja Foodi Deluxe going again.
- The screen should now say “incubate” and be set to 8 hours.
- Let the yogurt incubate. When the timer beeps, remove the lid and check to make sure that the yogurt has set up. You can do so by stick a spoon in the middle of the yogurt. The spoon should stand up on it’s own.
- Refrigerate yogurt for at least 4 hours.
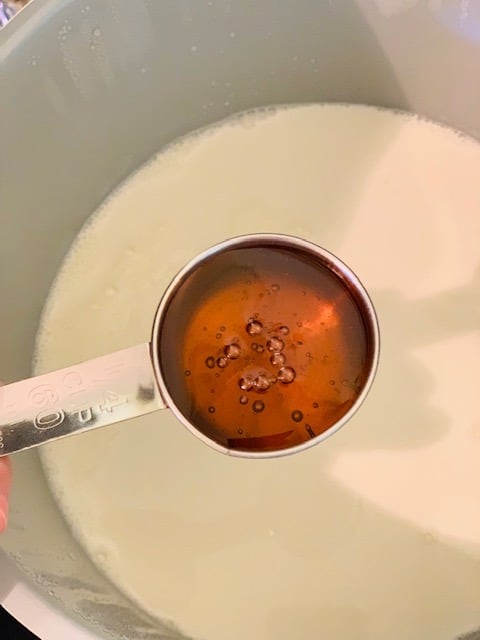
- Add in honey and vanilla extract or vanilla bean paste. Stir until well combined.
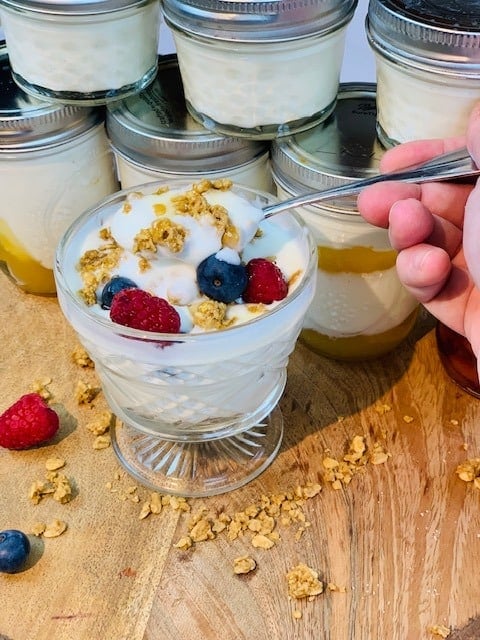
- Place into mason jars or whatever food storage containers you prefer.
Recipe

Ninja Foodi Vanilla Yogurt
Rate this Recipe Print Recipe Pin RecipeEquipment
Ingredients
- ½ gallon Milk (Ultra Pasteurized)
- 2 tablespoon Yogurt (Plain with active yogurt cultures- Any brand will do but the Fage 5% plain Greek yogurt worked for me!)
- 1 tablespoon Vanilla Extract (I used vanilla bean paste! :))
- ½ cup Honey
Instructions
- Turn the Ninja Foodi Deluxe "on."Choose the "yogurt" function. (Be sure that the screen says yogurt and not "hi.")
- Pour in ½ gallon of milk. Do not add in yogurt, flavors or sweeteners. Only the milk should be added in this step.
- Close the "pressure cooker" lid and move valve to "vent."
- Push the start button. The screen should say "yogurt" and be set to a time of 8:00.
- Milk will boil in the pot during the initial cooking time. Once the milk has reached a boil, the Ninja Foodi Deluxe will beep and the screen will say "boil" on it. This step should take about an hour.
- After the milk has boiled, it will need to cool. The Ninja Foodi Deluxe will automatically change to the "cool" mode. The milk will cool for about an hour or so. Don't panic if it does take longer.
- Once the milk has cooled, the Ninja Foodi Deluxe will beep and the screen will say "add and stir." When this happens, open the "pressure cooker" lid.Add in 2 tablespoons of yogurt (the yogurt must have active yogurt cultures).
- Whisk the milk and yogurt together with a plastic or silicone whisk. Do not use a metal whisk as this will scrape the pot.
- Replace the "pressure cooker" lid and make sure valve is set to "vent" position.
- Push start button again to get the Ninja Foodi Deluxe going again.
- The screen should now say "incubate" and be set to 8 hours.Let the yogurt incubate. When the timer beeps, remove the lid and check to make sure that the yogurt has set up. You can do so by stick a spoon in the middle of the yogurt. The spoon should stand up on it's own.
- Refrigerate yogurt for at least 4 hours.
- Add in honey and vanilla extract or vanilla bean paste. Stir until well combined.
- Place into mason jars or whatever food storage containers you prefer.
Notes
- Do not add honey to the yogurt until you have completed the incubation period and have refrigerated the yogurt for a couple of hours.
- Be sure that you are actually using the “yogurt” function and not the “slow cook” option.
- Be patient! If the yogurt does not set up quite as much as you would like, continue to incubate it longer. You can continue to incubate before you reach the refrigeration step.
Nutrition
Nutrition information is provided as a courtesy and is an estimate only.


Gil says
Remove cover to speed up second step. Food will remain in cool mode and beep when it is ready for ferment step.
Angelique says
thank you!!! that’s exactly the permission I was looking for. Cooking step really varies in duration in my experience.
Valeria says
Hi, I just finished the fermenting process and the yogurt consistency looks wonderful. I am currently draining it to make it thicker. My concern is the following: the color looks a bit off. It’s not a pure white like you would expect, but instead it’s the color of condensed milk. Did something go wrong? I waited for the foodie to cool on its own but it took about 5 hours. By then the temp was just below 100 degrees. Could this be the reason? Consistency looks good and there are no offensive odors. Should I still eat it? (I a pot honey or vanilla yet, and probably might skip that step)
Valeria says
I meant to say that the color is that of evaporated milk, not condensed milk- sorry!
Lauren Cardona says
Hi Valeria- When making yogurt, it should be white in color and not brown. It’s possible that the milk cooked too long and burned. When you selected the function, did you make sure that the function was on yogurt and not slow cook? I ask because I made this mistake and ended up slow cooking the milk for several hours. Take a look at “Take 1” in the post and see if that’s possible. The results of my first attempt resulted in light brown colored “yogurt.”
Sg says
Psst. I thought I would share- The cultures for health website mentioned above- says this about ultra pasteurized milk-Ultra-pasteurized Milk (UP) or ultra-high temperature treatment (UHT), is heated to 275°F or higher for about one second. UHT milk is actually cooked, and is therefore unsuitable for culturing.
They suggest just pasteurized not ultra pasteurized.
Jocelyn says
I opened the lid while on cool mode now it’s seems to be stuck on cool. Might have to start over.
Sg says
Thanks so much for your recipe. It was so so helpful. I’m so happy I read it before starting the first time. I also wished I had read all the comments lol. My ninja took forever to cool- 3-4 hours. Eventually I heard the beep and it switched. Ninja should make the alarm continuous because you could miss it! I will definitely open the pot next time to help it cool.
No one has asked this -how long does this recipe keep in fridge in Tupperware or mason jar?
Lauren Cardona says
Yogurt will stay good in the refrigerator in a sealed container for about 2 weeks.
Allen Hyduck says
I’m making this recipe as I sent this note. I’ve made yogurt before in another machine. I have a Ninja XL 8 qt with Air Fry. I’m using 1/2 gallon of 2% milk. I poured in the milk, set it to Yogurt, and hit start. After it boiled, it started to cool. I don’t like to wait, so I took out the pot, and put it in my sink with cool running water. It cooled it down to about 115 in about 5 minutes. Then, I dried off the pot, put it back in, and it still said cooling. So, not wanting to wait, I hit start. Nothing happened. So, I hit end! I thought I had a disaster because when I hit start again, it went to boiling. I turned it off again and did some research that will help lots of you. I learned that when I turned it on again, and hit Yogurt, I could then hit the Temp button, up or down, and it says, “Ferm”. I hit start and it started on 8 hours. I probably could have just hit the temperature button to start with and it would have gone to Ferment, and then hit start, but ending the program, and starting it again on Yogurt in the Ferment mode worked. Now I’ll see if I have yogurt in the morning.
Sarah says
Your research about being able to hit the temp button to bring the cycle from boil to ferment helped me greatly and I just had to say thank you, I’m making my yogurt while awake today rather than sleeping while it ferments (next time I think I’ll do it that way though) and didn’t want to wait and did the ice bath cool as well, then panicked that I couldn’t get the yogurt setting back to where I left it off. Now hopefully my first batch goes successfully.
Kyra Peacock says
Thank you so much for your comment, I too started to panic haha.
Giselle says
You saved me! I did the exact same thing. And then I called Ninja to ask them what to do and they said not to ferment in the cooker! I was panicking. This totally worked. Thank you!
Lauren Cardona says
Glad you figured it out! It’s so tricky and can make for a disastrous batch of yogurt! At least next time it will be easier! 🙂
Steve Durain says
thank you for this information. I used to have a Yedi cooker which died on me as I was making a batch of yogurt, so had to resort to using my oven light as a heat source. I have since bought the Foodi, and didn’t like the idea of having my machine “boil” the milk before the ferment, but just want to use it to ferment. I tried another method where they used the dehydration function and I am not satisfied with the results.
Koty says
I have the 8qt foodi. Do you know if I can use a full gallon of milk in it to make yogurt?
I’ve made yogurt many times in my slow cooker, and i always use a full gallon to get lots of yogurt.
Wondering if this would work as well before I try…I dont want to waste a full gallon!
TheTastyTravelers says
Yes you can make a full gallon. I have done it before. Keep in mind that the more liquid you have in the pot, the longer it will take for it to change temps and stages of the yogurt making process. Just be patient if it’s taking longer than expected.
Jeremy White says
I used half a gallon of fat free milk. Consistency came out a bit watery. What increments of time would you suggest for firming it up?
Nat F says
When I use fat free milk, it doesn’t come out watery, it just comes out with a less creamy more “grainy” texture if that makes sense. It’s the fat that makes it seem creamy. If yours has a watery texture, strain it using cheesecloth or a cheese bag to remove the extra whey.
Lucie says
I make yogurt with honey all the time. Add 1/3 cup of yogurt (Fage) as starter, with 1/3 c honey in your cooled milk. I also add a sweetener, 1/3 c sugar equivalent. I add 2 T vanilla, too, but I have found real vanilla kills the cultures. Dr Watkins clear vanilla is amazing. If you like thicker yogurt, add 1/3 c instant dried milk to the milk before heating.
Jackie says
I’m new to the Foodi. How does it know when the milk has cooled? Does it take the temperature or does it go just by time?
TheTastyTravelers says
I believe it goes by temperature as the time varies based on how much liquid you have in the pot.
Myriam says
Thank you soooo much
ANA says
Something on my Ninja Foodie instructions did not seem right so I decided to google before starting up. Thank you for posting this! I was puzzled between HI and L until I found out is neither! I just started the process, and after exactly 30 min it beeped to COOL. Not sure if this is too soon but that is what the machine did. I’ll wait a bit over an hour to see if it cools down and if not I’ll open the lid to make it cool faster as I read some of the comments that this has helped people.
I am nervous because my daughter was super excited of me making homemade yogurt, but so far it looks I am on the right track. Thanks again for sharing your experience! 🙂
TheTastyTravelers says
You are so welcome! I’m so glad this post was helpful and my mistakes could make your experience better. 🙂
Kat says
How do you incubate the yogurt longer if it is not the right consistency when it is done? Can you use heavy cream instead of whole milk?
TheTastyTravelers says
Hi Kat- I have not tried making yogurt with heavy cream yet so I can’t advise one way or the other. To incubate the yogurt outside of the yogurt setting, you can use the dehydrate function set to 180 degrees Fahrenheit.
Sarah says
This was helpful because my yogurt was not that thick though I followed directions. I will use dehydrate setting next time or strain as suggested by someone else. Also my Ninja Foodie never said incubate or ferment. It is not a deluxe though it does have a yogurt setting. It just had the 8:00 setting after the add and stir setting.
How long does yogurt keep in fridge in mason jar?
Lauren Cardona says
Yogurt will stay good in the refrigerator in a sealed container for about 2 weeks.
Gayle says
Draining the finished yogurt results in thicker yogurt. I haven’t seen it mentioned. I line a colander with coffee filters and set over a deep bowl. Fill with finished yogurt and let drain. I cover the colander with foil to keep out refrigerator odors. I drain for a couple of hours. Place drained yogurt in storage container. Add whey (water left from yogurt) and whisk until you have the consistency you want. Remaining water may be used for bread making.
TheTastyTravelers says
Hi Gayle! You are absolutely right! I have drained some and not others based on how much whey has been produced. They even sell awesome greek yogurt strainers now too! Thanks for adding in this helpful tip! 🙂
Lori says
After the yogurt has incubated, if it needs longer than the 8 hours, how do you continue incubating if it needs longer? My foodie went to a warm stage. It didn’t set up as much as I wanted after it changed to warming. Thank you
TheTastyTravelers says
Hi Lori- If the yogurt is not quite thick enough, try straining it with either a yogurt strainer or cheesecloth. Usually removing most of the whey helps to thicken it up nicely.
Kayte Anderson says
Thanks to another comment, you can get back into the fermenting stage by pressing slow Cook yogurt twice, then pressing the temp button!
Miranda says
Thank you so much for posting this. Tried making yoghurt for the first time yesterday and couldn’t work out what I had done wrong till I read your post….I had basically slow cooked milk for 8 hours 😂. Didn’t realise that Yoghurt and Slow Cook were actually two different functions as they share the same stop.