

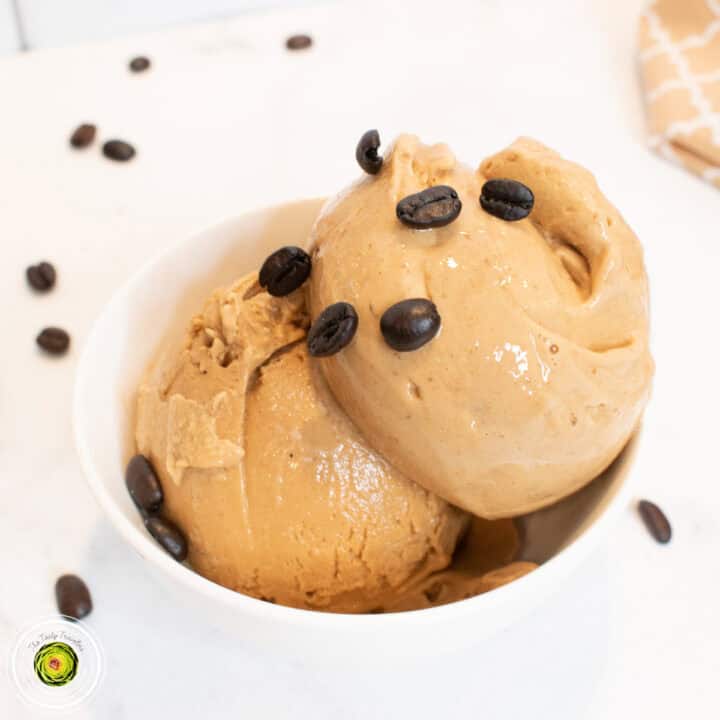
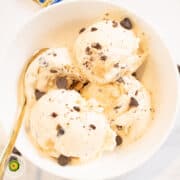
Check out my recipe for making Ninja Creami Mocha Espresso Protein Ice Cream! It’s like having the best, richest, chocolatey coffee ever! Only, it’s even better because it’s in ice cream form…and it’s packed with protein!!
I don’t know what it is about coffee-flavored ice cream. I don’t even like coffee that much. But, coffee ice cream gets me every time! For this recipe, I combined the flavors of coffee with chocolate! I mean, how could you possibly go wrong with that combination? It tastes so good you’d never even know that it was made using a protein shake! It has just enough coffee flavor and the perfect consistency thanks to the Ninja Creami ice cream maker!!
This recipe comes in at 380 calories, 31 grams of protein, 1 gram of sugar, 13.5 grams of fat, and 52 carbs for the ENTIRE pint. See the recipe card at the bottom of the post for all nutrition facts.

There are a million different flavor variations for making any type of ice cream in the Ninja Creami! Even when you make protein ice cream, you can come up with almost any flavor that you want. I like to start by deciding what I want the base of the ice cream to taste like. I accomplish that flavor by picking the right protein shake flavor and then adding in more flavor with extracts, powders, fruit, or syrups. The protein shake by itself just does not have enough flavor on its own. It needs something to help intensify the flavor.

Once you’ve got a great tasting base, pick mix-ins that compliment those flavors. With mocha espresso protein ice cream, it was pretty easy to pick the perfect mix-in…chocolate chips. The mix-ins help add even more flavor and add a bit of texture to the creamy ice cream.

Why is My Ice Cream Like Soft Serve Instead of Thick and Creamy?
If your ice cream is coming out with more of a soft-serve texture, check the temperature of your freezer. The ideal freezer temperature for Ninja Creami creations is between 9 and -7 degrees Fahrenheit. If your freezer is not cold enough, the ice cream may never get hard enough.
Also, be sure that you are using some sort of stabilizer/thickener. If you don't the ice cream may not come together very well and will remain much softer than expected. Click here for a list of stabilizers/thickeners that you can use.

Getting the PERFECT texture for your Ninja Creami creations can be a little tricky. But once you have mastered the recipe and technique, you’ll end up with the thickest, creamies ice cream ever!! I’ve found that using an instant pudding mix or guar gum is the easiest way to achieve the perfect texture every time! Oh, and be sure that you are freezing the ice cream for 24 hours before processing. It’s oh-so-tempting to pull the pint out of the freezer and process it sooner, but it’s likely not FULLY frozen all the way through. Processing ice cream that is not frozen enough can result in a softer or icier texture than is expected.

Tips for Making Ninja Creami Mocha Espresso Protein Ice Cream:
You can, if you can find it. You need INSTANT espresso powder. I've only been able to find caffeinated. But, if you can find a decaffeinated version that is in a concentrated powder form, you can use it. Don't use liquids or the kind of coffee grounds that need to be brewed.
Not for this recipe, no. Brewed coffee has a lot of water in it and a less intense flavor. Using brewed coffee will make the espresso protein ice cream very icy and less flavorful.
There are a couple of options. You can let the container of ice cream sit out for 10-20 minutes on the counter, microwave it for about 15 seconds, or run warm water around the outside of the container before processing. After the first spin, scrape the sides of the ice cream down with a spoon and then spin again. This may reduce the amount of ice crystals in the ice cream, but it will also make the ice cream softer in texture.
According to the manufacturer's directions, you should freeze the Ninja Creami ice cream for 24 hours. You want to make sure that the ice cream is completely frozen throughout. Although, many have frozen for shorter periods of time and have had good results.
The nutritional information for all of my Ninja Creami recipes is based on a full pint or 16 ounces. Now, many do not eat a full pint of ice cream in one sitting. Some do as they are using the Ninja Creami to make meal replacements. A traditional serving size for ice cream is about ½ cup or 4 ounces.
Looking for more Ninja Creami Protein Ice Cream Recipes?

Ingredient Substitutions for Making Ninja Creami Mocha Espresso Protein Ice Cream:
The full ingredient list is at the bottom of this post in the recipe card.

Chocolate Protein Shake-I used a chocolate premier protein shake for this recipe. But, you can use your favorite brand of protein shake. Since protein shake taste and texture
Sugar-Free Instant Chocolate Fudge Pudding Mix-You can use a pudding mix that has sugar but the nutrition info will change based on what you use. Use the powdered mix and not premade or cook and serve pudding.
Instant Espresso Powder- Make sure that you are using instant espresso powder and not an actual shot of espresso or brewed coffee. Using the powder helps reduce the amount of water added to the mixture and provides a much richer, creamier, and less icy result.
Dark Cocoa Powder- I prefer to use the dark cocoa powder as it’s got a deep chocolate flavor than regular cocoa powder.
Zero Sugar Chocolate Chips (Chopped)– You can use any chocolate chips that you would like, but be sure to cut them up into small pieces as the large chips get very hard and are difficult to chew.
Optional
Chocolate Almond Milk– Any dairy or dairy substitute can be used. You may not need it. If the ice cream is dry and crumbly after processing, you’ll need to add a tablespoon or two of liquid. You can use fat free milk, skim milk, whole milk, heavy whipping cream, unsweetened almond milk, oat milk, coconut milk, soy milk, or any other dairy substitute that you would like.
Directions for making Ninja Creami Mocha Espresso Protein Ice Cream:
Directions for Making the Ice Cream Mixture
- Pour the chocolate protein shake, pudding mix, instant espresso powder, and dark cocoa into a small blender and blend together until the pudding mix is completely combined with the liquids. Pour the mixture into the Ninja Creami pint container.
- Freeze on a level surface for 24 hours. Your freezer should be between 9 and -7 degrees Fahrenheit. To avoid getting a bump on the top of the frozen mixture, freeze with the lid off of the container.

Directions for Processing the Ice Cream Mixture
- Place the pint container into the outer bowl of the Ninja Creami and then process on "LITE ICE CREAM."
- If the ice cream is dry or crumbly looking, pour in a tablespoon or two of chocolate almond milk and then respin. You may have to repeat this process a couple of times.
- Pour in 2 tablespoons of chocolate chips and process using the Mix-ins function.
- Remove the pint from the machine and enjoy!

Save for Later on Pinterest!

Recipe

Ninja Creami Mocha Espresso Protein Ice Cream
Rate this Recipe
Equipment
Add Food Grade Vegetable Glycerin To Make Leftover Ice Cream Scoopable Right Out of the Freezer
Per 16 ounce pint: *Add 1 Teaspoon to full fat/full sugar bases *Add 1.5 teaspoon to high protein bases *Add 2 teaspoons to low sugar/low fat lite bases. Freeze and process per the recipe. Take the leftovers out of the freezer and scoop without having to reprocess. ***This is a guideline and adjustments may be needed based on your recipe.
Original, Breeze, Swirl, and Deluxe Ingredient Measurements
Use the multiplier below to adjust quantities based on the machine that you own. ***If you have the Original, Breeze, or Swirl machine, which use 16 ounce containers, choose the 1X option. ***If you have the Deluxe or XL machine, which use 24 ounce containers, choose the 1.5X option.
Ingredients
Ice Cream Base
- 11.5 Ounces (326 g) Chocolate Protein Shake
- 2 Tablespoons (2 Tablespoons) Sugar-Free Instant Chocolate Fudge Pudding Mix
- 2 Tablespoon (2 Tablespoon) Instant Espresso Powder
- 1 Tablespoon (1 Tablespoon) Dark Cocoa Powder
Mix-ins
- 2 Tablespoons (2 Tablespoons) Zero Sugar Chocolate Chips (Chopped)
Optional
- 1-2 Tablespoons (2 Tablespoons) Chocolate Almond Milk
Instructions
Make the Ice Cream Mixture
- Pour the chocolate protein shake, pudding mix, instant espresso powder, and dark cocoa into a small blender and blend together until the pudding mix is completely combined with the liquids. Pour the mixture into the Ninja Creami pint container.
- Freeze on a level surface for 24 hours. Your freezer should be between 9 and -7 degrees Fahrenheit. To avoid getting a bump on the top of the frozen mixture, freeze with the lid off of the container.
Process the Ice Cream
- After 24 hours, remove the pint container from the freezer.
- Place the pint container into the outer bowl of the Ninja Creami and then process on "LITE ICE CREAM."
- If the ice cream is dry or crumbly looking, pour in a tablespoon or two of chocolate almond milk and then respin. You may have to repeat this process a couple of times.
- Pour in 2 tablespoons of chocolate chips and process using the Mix-ins function.
- Remove the pint from the machine and enjoy!
Notes
Nutrition
Nutrition information is provided as a courtesy and is an estimate only. Optional ingredients are not included in the nutrition information.
Recipes that use allulose:
Allulose is a low calorie sweetener that your body doesn't fully digest, so it provides only 0.4 calories per gram instead of 4. That's why the calorie total doesn't match what you'd expect from the carb count. Calories from allulose are calculated based on metabolized carbohydrates. Allulose contributes fewer calories than standard carbohydrates.
Leave a comment and rate this recipe!
Keep scrolling to see my newest recipes!
-
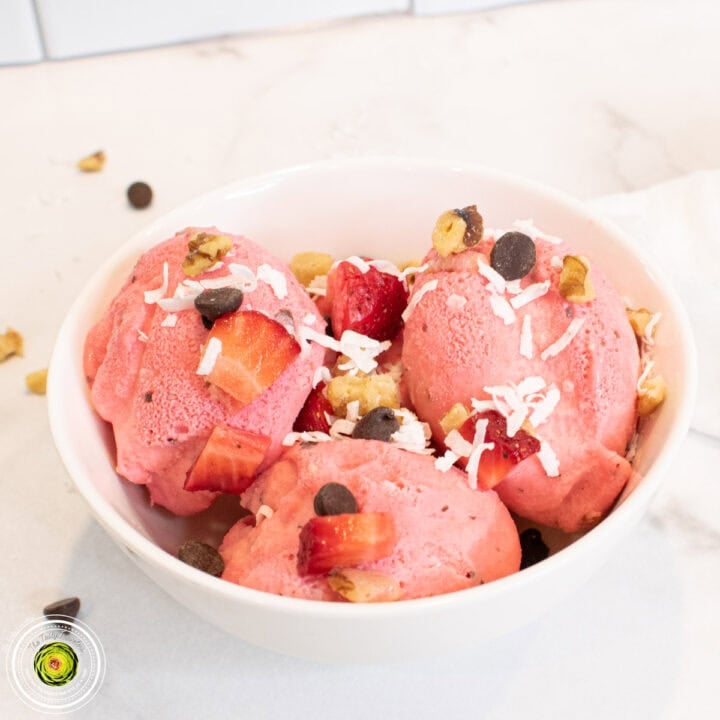
Ninja Creami Strawberry Coco-Nut Protein Ice Cream
If you love the combination of strawberry, coconut, and chocolate, you have to give this Ninja Creami strawberry coco-nut protein ice cream a try. It’s creamy, packed with real strawberry flavor, and the toasted coconut goes surprisingly well with chocolate chips and walnuts. This recipe comes in at 374 calories, 36 grams of protein, 4 grams of sugar, 19 grams of fat, and 19 carbs for the ENTIRE pint. Jump to: Tips for making Ninja Creami Strawberry Coco-Nut Protein Ice Cream Looking for more Ninja Creami Protein Ice Cream Recipes? Ingredient tips and substitutions Directions for Making the Ice Cream […]
-
Is It Normal for the Ninja Creami Spindle to Stick Out?
If you look at your Ninja Creami and notice the spindle poking out of the bottom of the machine, you might wonder if something is wrong. Nothing is wrong. Here’s why it looks like that and what to expect. Is it normal for the Ninja Creami spindle to stick out? Yes. The spindle sticking out of the bottom of the machine when it is off is completely normal and exactly how it is supposed to look. It sticks out about an inch when the machine is not in use. It should not go all the way back up into the […]
-
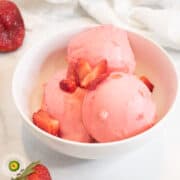
Ninja Creami Super Strawberry Protein Ice Cream
If you love strawberry ice cream, this Ninja Creami super strawberry protein ice cream is going to blow your mind. It has fresh strawberry flavor from FOUR different ingredients, a creamy texture, and a really bright pink color. Trust me, you’re going to love this recipe. This recipe comes in at 215 calories, 35 grams of protein, 6 grams of sugar, 3 grams of fat, and 12 carbs for the ENTIRE pint. Jump to: Tips for making Ninja Creami Super Strawberry Protein Ice Cream Looking for more Ninja Creami Protein Ice Cream Recipes? Ingredient tips and substitutions Directions for Making […]


-
How to Get Rid of Ice on the Outside of Ninja Creami Ice Cream
Sometimes a layer of ice forms around the inside walls of the Ninja Creami container during freezing, sitting between the outer edge of the frozen base and the container. If that ice gets mixed into the ice cream when you process it, it can affect the texture and make it icier than it should be. Here’s how to fix it so that the ice cream is creamy instead of icy. Why does ice form around the outside of the frozen base? When the base freezes, moisture from condensation or from the base itself can collect between the frozen mixture and […]
-
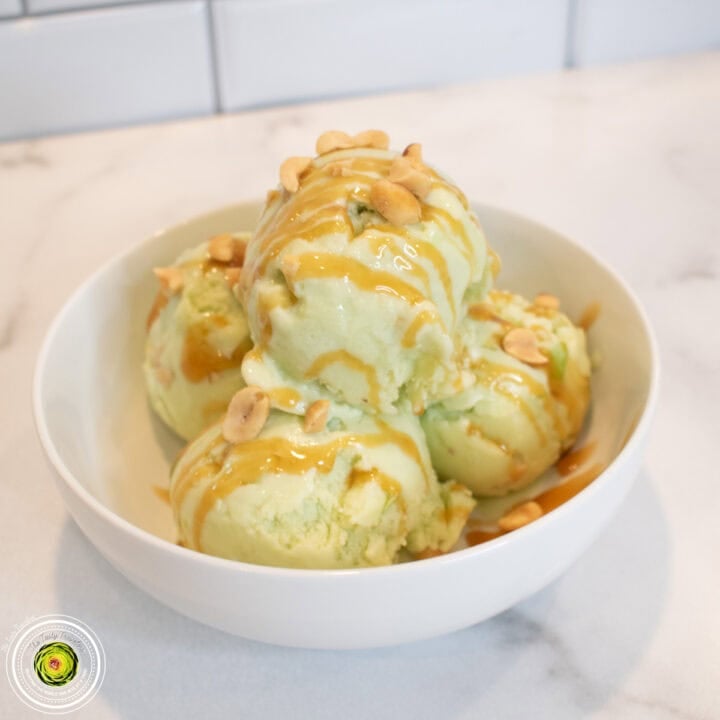
Ninja Creami Taffy Apple Protein Ice Cream
Taffy apples are one of my favorite fall treats, and this Ninja Creami taffy apple protein ice cream tastes just like one. You get that sweet caramel flavor, real green apple, and chopped peanuts in every bite. It’s creamy, sweet, a little tart, and so much fun to eat. This recipe comes in at 293 calories, 33 grams of protein, 17 grams of sugar, 8 grams of fat, and 26 carbs for the ENTIRE pint. Jump to: Tips for making Ninja Creami Taffy Apple Protein Ice Cream Looking for more Ninja Creami Protein Ice Cream Recipes? Ingredient tips and substitutions […]
-
When to Use Re-Spin vs. Processing on Ice Cream Again in Ninja Creami
Re-Spin and the Ice Cream function on the Ninja Creami are not interchangeable. Using the wrong one at the wrong time will not give you the result you’re looking for and can even damage your machine. Here’s exactly when to use each one. What is the difference between Re-Spin and processing on Ice Cream? Ice Cream (and other processing functions) are designed to process a frozen solid base. Re-Spin is designed to further smooth a base that has just been processed, but came out with a texture that isn’t quite right. They are two different functions for two different situations. […]


-
Ninja Creami Caramel Cookie Supreme Protein Ice Cream
Caramel ice cream loaded with chunks of sugar cookie dough and pieces of Werther’s Original candies? Yes please!!! This Ninja Creami caramel cookie supreme protein ice cream is creamy, sweet, and tastes like a no-bake sugar cookie wrapped up in caramel ice cream with 30 grams of protein in the ENTIRE pint. This recipe comes in at 308 calories, 30 grams of protein, 7.5 grams of sugar, 7 grams of fat, and 31 carbs for the ENTIRE pint. Jump to: Tips for making Ninja Creami Caramel Cookie Supreme Protein Ice Cream Looking for more Ninja Creami Protein Ice Cream Recipes? […]
-
Ninja Creami Caramel Chocolate Chip Cheesecake Protein Ice Cream
Caramel, cheesecake, and chocolate chips all in one ice cream? Yes please!!! This Ninja Creami caramel chocolate chip cheesecake protein ice cream is thick, creamy, and has so much real caramel flavor with bits of Werther’s Original candies and chopped chocolate chips throughout every single bite. This recipe comes in at 315 calories, 30 grams of protein, 1 gram of sugar, 9.5 grams of fat, and 37 carbs for the ENTIRE pint. Jump to: Tips for making Ninja Creami Caramel Chocolate Chip Cheesecake Protein Ice Cream Looking for more Ninja Creami Protein Ice Cream Recipes? Ingredient tips and substitutions […]
-
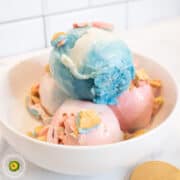
Ninja Creami Cotton Candy Protein Ice Cream
If you love cotton candy, you have to try this Ninja Creami cotton candy protein ice cream. It tastes EXACTLY like the cotton candy you’d get at a carnival, has 31 grams of protein per pint, and it comes out pink, white, and blue right in the same container. You would never know it’s a protein ice cream! This recipe comes in at 357 calories, 31 grams of protein, 16 grams of sugar, 11.5 grams of fat, and 53 carbs for the ENTIRE pint. Jump to: Tips for making Ninja Creami Cotton Candy Protein Ice Cream Looking for more Ninja […]


-
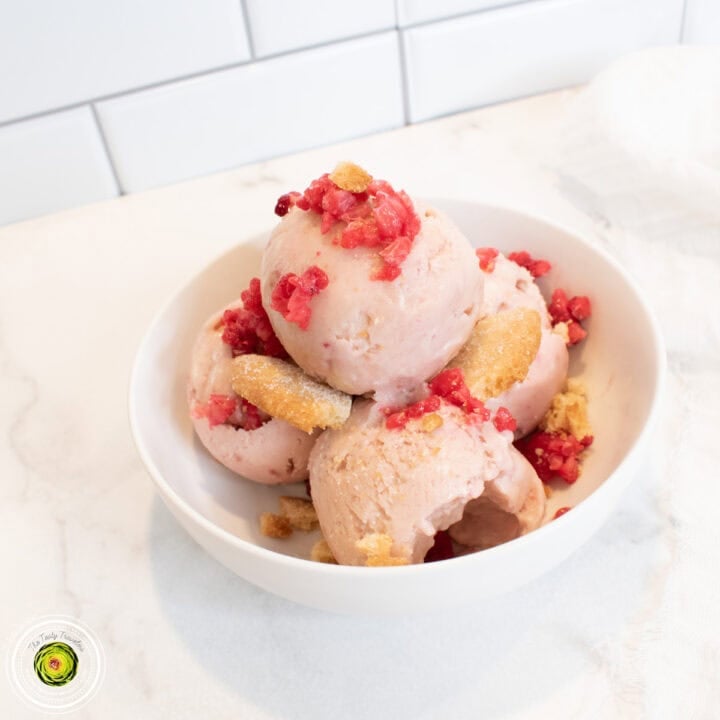
Ninja Creami Strawberry Pretzel Pie Protein Ice Cream
If you have ever had strawberry pretzel pie at a summer BBQ or potluck, you know how good those flavors are together. This Ninja Creami strawberry pretzel pie protein ice cream takes that same combination of sweet strawberry, cheesecake, and crunchy pretzel and turns it into a thick and creamy frozen treat. I promise you would never know it has 33 grams of protein! This recipe comes in at 359 calories, 33 grams of protein, 10 grams of sugar, 4 grams of fat, and 50 carbs for the ENTIRE pint. Jump to: Tips for making Ninja Creami Strawberry Pretzel Pie […]
-
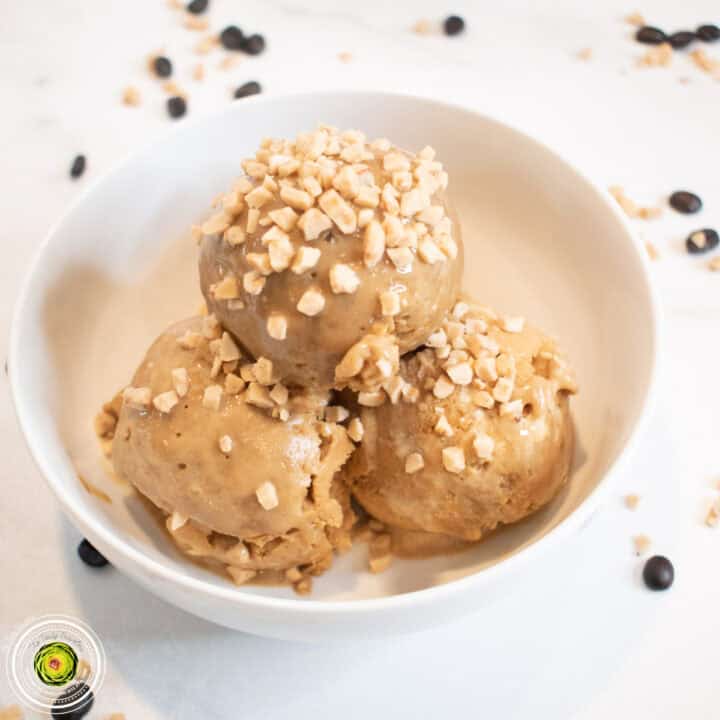
Ninja Creami Coffee Toffee Protein Ice Cream
If you love coffee ice cream, you have to try my recipe for Ninja Creami toffee coffee protein ice cream. It has the perfect amount of coffee flavor, a thick and creamy texture, and a really good crunch from the Heath chip mix-ins. I promise you would never know it’s a protein ice cream! This recipe comes in at 357 calories, 30 grams of protein, 19 grams of sugar, 13 grams of fat, for the ENTIRE pint. Jump to: Tips for making Ninja Creami Toffee Coffee Protein Ice Cream Looking for more Ninja Creami Protein Ice Cream Recipes? Ingredient tips […]
-
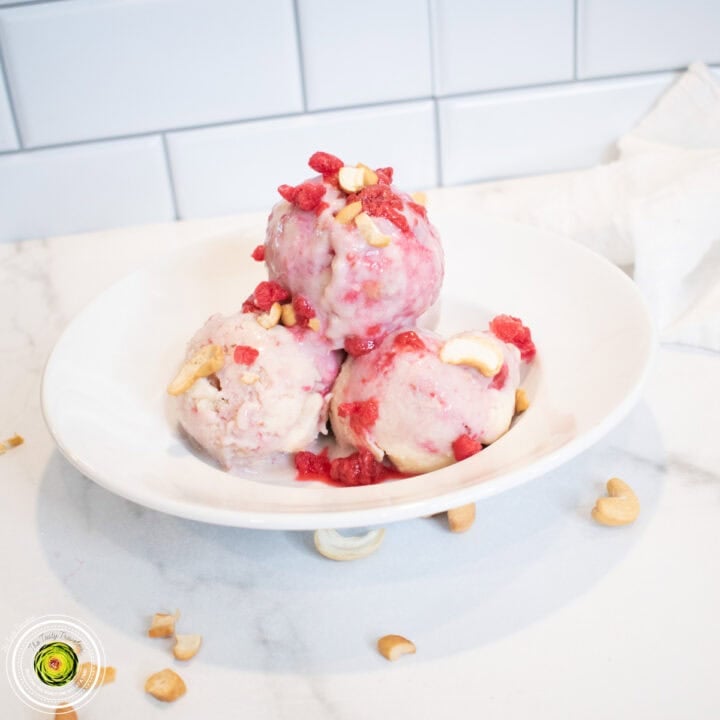
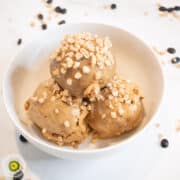
Ninja Creami Baseball Nut Protein Ice Cream
If you loved Baskin Robbins Baseball Nut ice cream as a kid, you have to try this Ninja Creami baseball nut protein ice cream. It’s a creamy vanilla base loaded with chopped cashews and homemade raspberry sauce throughout, and I promise you would never know it’s a protein ice cream. Jump to: Tips for making Ninja Creami Baseball Nut Protein Ice Cream Looking for more Ninja Creami Protein Ice Cream Recipes? Ingredient tips and substitutions Directions for Making the Ice Cream Mixture Directions for Processing the Ice Cream Mixture Save for Later on Pinterest! Recipe Comments Baseball Nut from Baskin […]

-
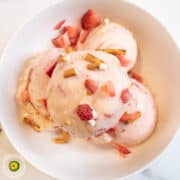
Ninja Creami Peach Cobbler Cottage Cheese Protein Ice Cream
I will be the first person to tell you that I HATE cottage cheese. I cannot stand the texture, the flavor, none of it. So when I tell you that this Ninja Creami Peach Cobbler Cottage Cheese Protein Ice Cream does not taste like cottage cheese, I mean it! I promise! This recipe comes in at 297.59 calories, 38.2 grams of protein, 21.11 grams of sugar, 4.23 grams of fat, and 27.68 grams of carbs for the ENTIRE pint. See the recipe card at the bottom of the post for all nutrition facts. Jump to: Tips for making Ninja Creami […]
-
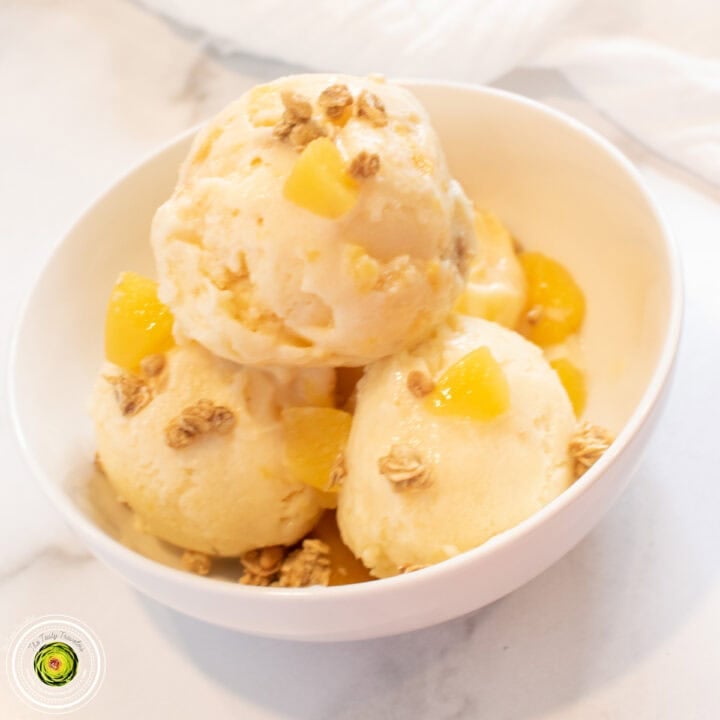
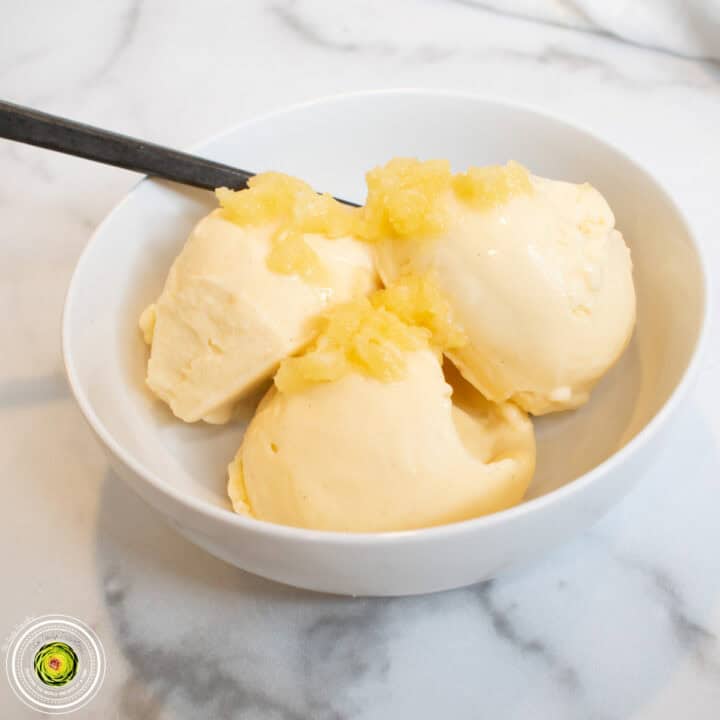
Ninja Creami Pineapple Dole Whip Protein Ice Cream
If you have ever had a Dole Whip at Disney World, you know how addicting they are. This Ninja Creami Pineapple Dole Whip Protein Ice Cream brings that same creamy pineapple flavor home, but with a TON of protein packed into the whole pint. Trust me, you would never know it’s a healthier version! This recipe comes in at 346.67 calories, 31.33 grams of protein, 24 grams of sugar, 3 grams of fat, and 47 grams of carbs for the ENTIRE pint. See the recipe card at the bottom of the post for all nutrition facts. Jump to: Tips for […]
-
Secret Ingredient to Make Coffee Ice Cream
If you want rich, bold coffee flavor in your Ninja Creami ice cream, instant espresso powder is the way to do it. No extra liquid, no fuss, and you can dial in exactly how much coffee flavor you want. Here’s everything you need to know. Why use instant espresso powder instead of brewed coffee? Brewed coffee is mostly water. Adding it to your Ninja Creami base means you’re adding liquid that can change the consistency of your recipe and water down the other flavors. Instant espresso powder is pure concentrated coffee flavor with no extra liquid. You get all the […]

-
Use Powdered Peanut Butter for More Flavor in Ninja Creami Recipes
If you want more peanut butter flavor in your Ninja Creami ice cream without adding on extra fat and calories, powdered peanut butter is a simple swap that delivers a richer, more concentrated peanut butter taste. Here’s why it works and how to use it. What is powdered peanut butter? Powdered peanut butter is made by pressing most of the fat out of roasted peanuts and grinding what’s left into a fine powder. What remains is concentrated peanut butter flavor with significantly less fat, fewer calories, and less sugar than regular peanut butter. It has the same nutty, roasted peanut […]
-
How Long Can You Freeze a Ninja Creami Base Before Processing?
Everyone knows that it’s recommended to freeze your Ninja Creami base for 24 hours before processing. But does it need to be frozen for exactly 24 hours? How long is too long, and does it actually matter if your Ninja Creami base has been sitting in the freezer for a week or more? Is there a maximum freeze time for Ninja Creami bases? Ninja does not publish an official maximum freeze time. The 24 hour minimum is well established, but there is no hard cutoff on the other end. Many people make their ice cream base with the intention of […]
-
How to Get Even More Vanilla Flavor in Your Ice Cream…
If you’ve been using vanilla extract in your Ninja Creami recipes and want to take the vanilla flavor up a notch, vanilla bean paste is the upgrade. Same effort, noticeably better results. What is vanilla bean paste? Vanilla bean paste is exactly what it sounds like. It’s a thick paste made from real vanilla beans. It contains the actual seeds scraped from inside vanilla bean pods, which is where the most intense vanilla flavor lives. When you use it in ice cream, you get those tiny black vanilla bean specks throughout the pint, along with a deeper, richer vanilla flavor […]


Comments
No Comments